Help Centre
DEFINITIONS
Use the name referring to the section of canyon that is being logged, if the canyon has more than one name, you can choose. If the canyon doesn’t already have a name, use the river.
Enter the name of the river in the canyon.
Give a brief summary of the canyon.
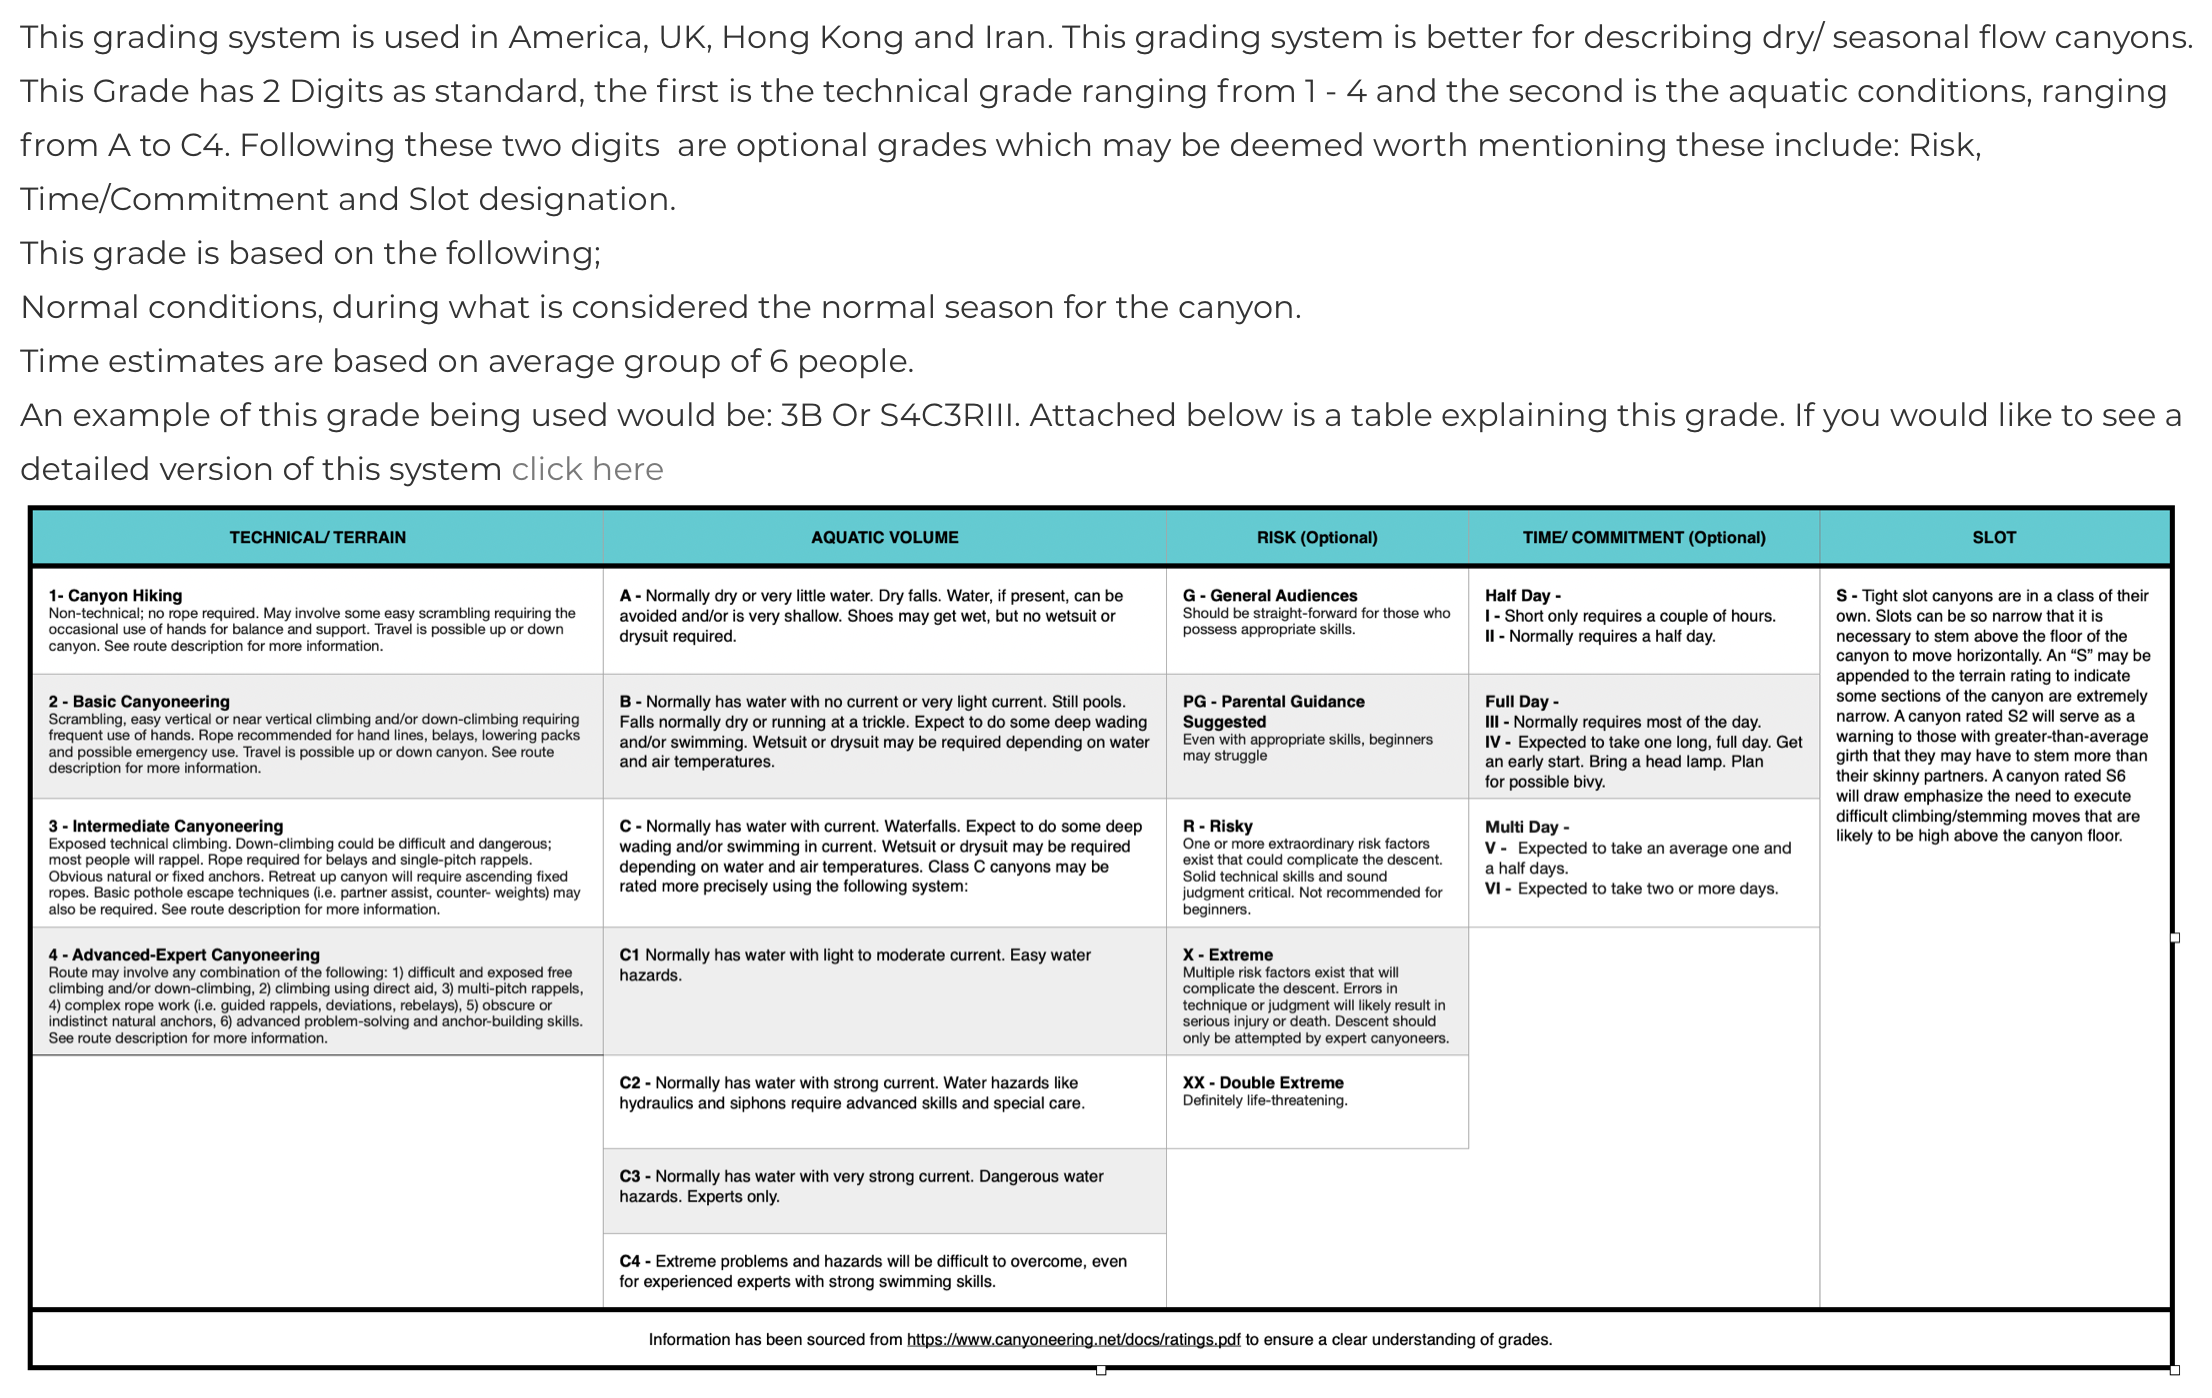
Enter the FFME Grade of the canyon, refer to the FFME grading system definitions.
Enter the ACA grade of the canyon, refer to the ACA grading system definitions.
Based on the FFME definitions of star ratings.
Enter the distance traveled in the canyon.
Enter the number of meters you descend in the canyon, for more information visit help page.
Enter the highest drop you will descend in the canyon.
Enter the minimum amount of ropes required to safely descend the canyon, taking into account hand lines are isolated to abseils.
Enter the type of rock found in the canyon, if unsure of the rock type, click here.
Enter the size of the catchment area of the canyon.
Enter the time it would take a group of 4 to;
Walk from car to the start.
Start to finish of canyon.
finish of canyon to car.
To give the first teams some recognition, enter their names here.
Any important details that haven’t already been mentioned go here.
A description of the canyon approach, descent and exit. Include any escape notes if appropriate.
Choose the most common form of anchor found in the canyon.
Select private if permission is required to enter the canyon or if access crosses private land.
Upload either; a copy of a topo for this canyon, a hand drawn version of a topo or a written description of the topo.
Upload photos of this canyon, these will be posted on the page.
Upload a photo of a map with a drawing of the best way access and exit the canyon.
A photo of the river with which can be used to gauge the water level.
Journey Card
Draw a route showing the best way to access, descend and exit the canyon.
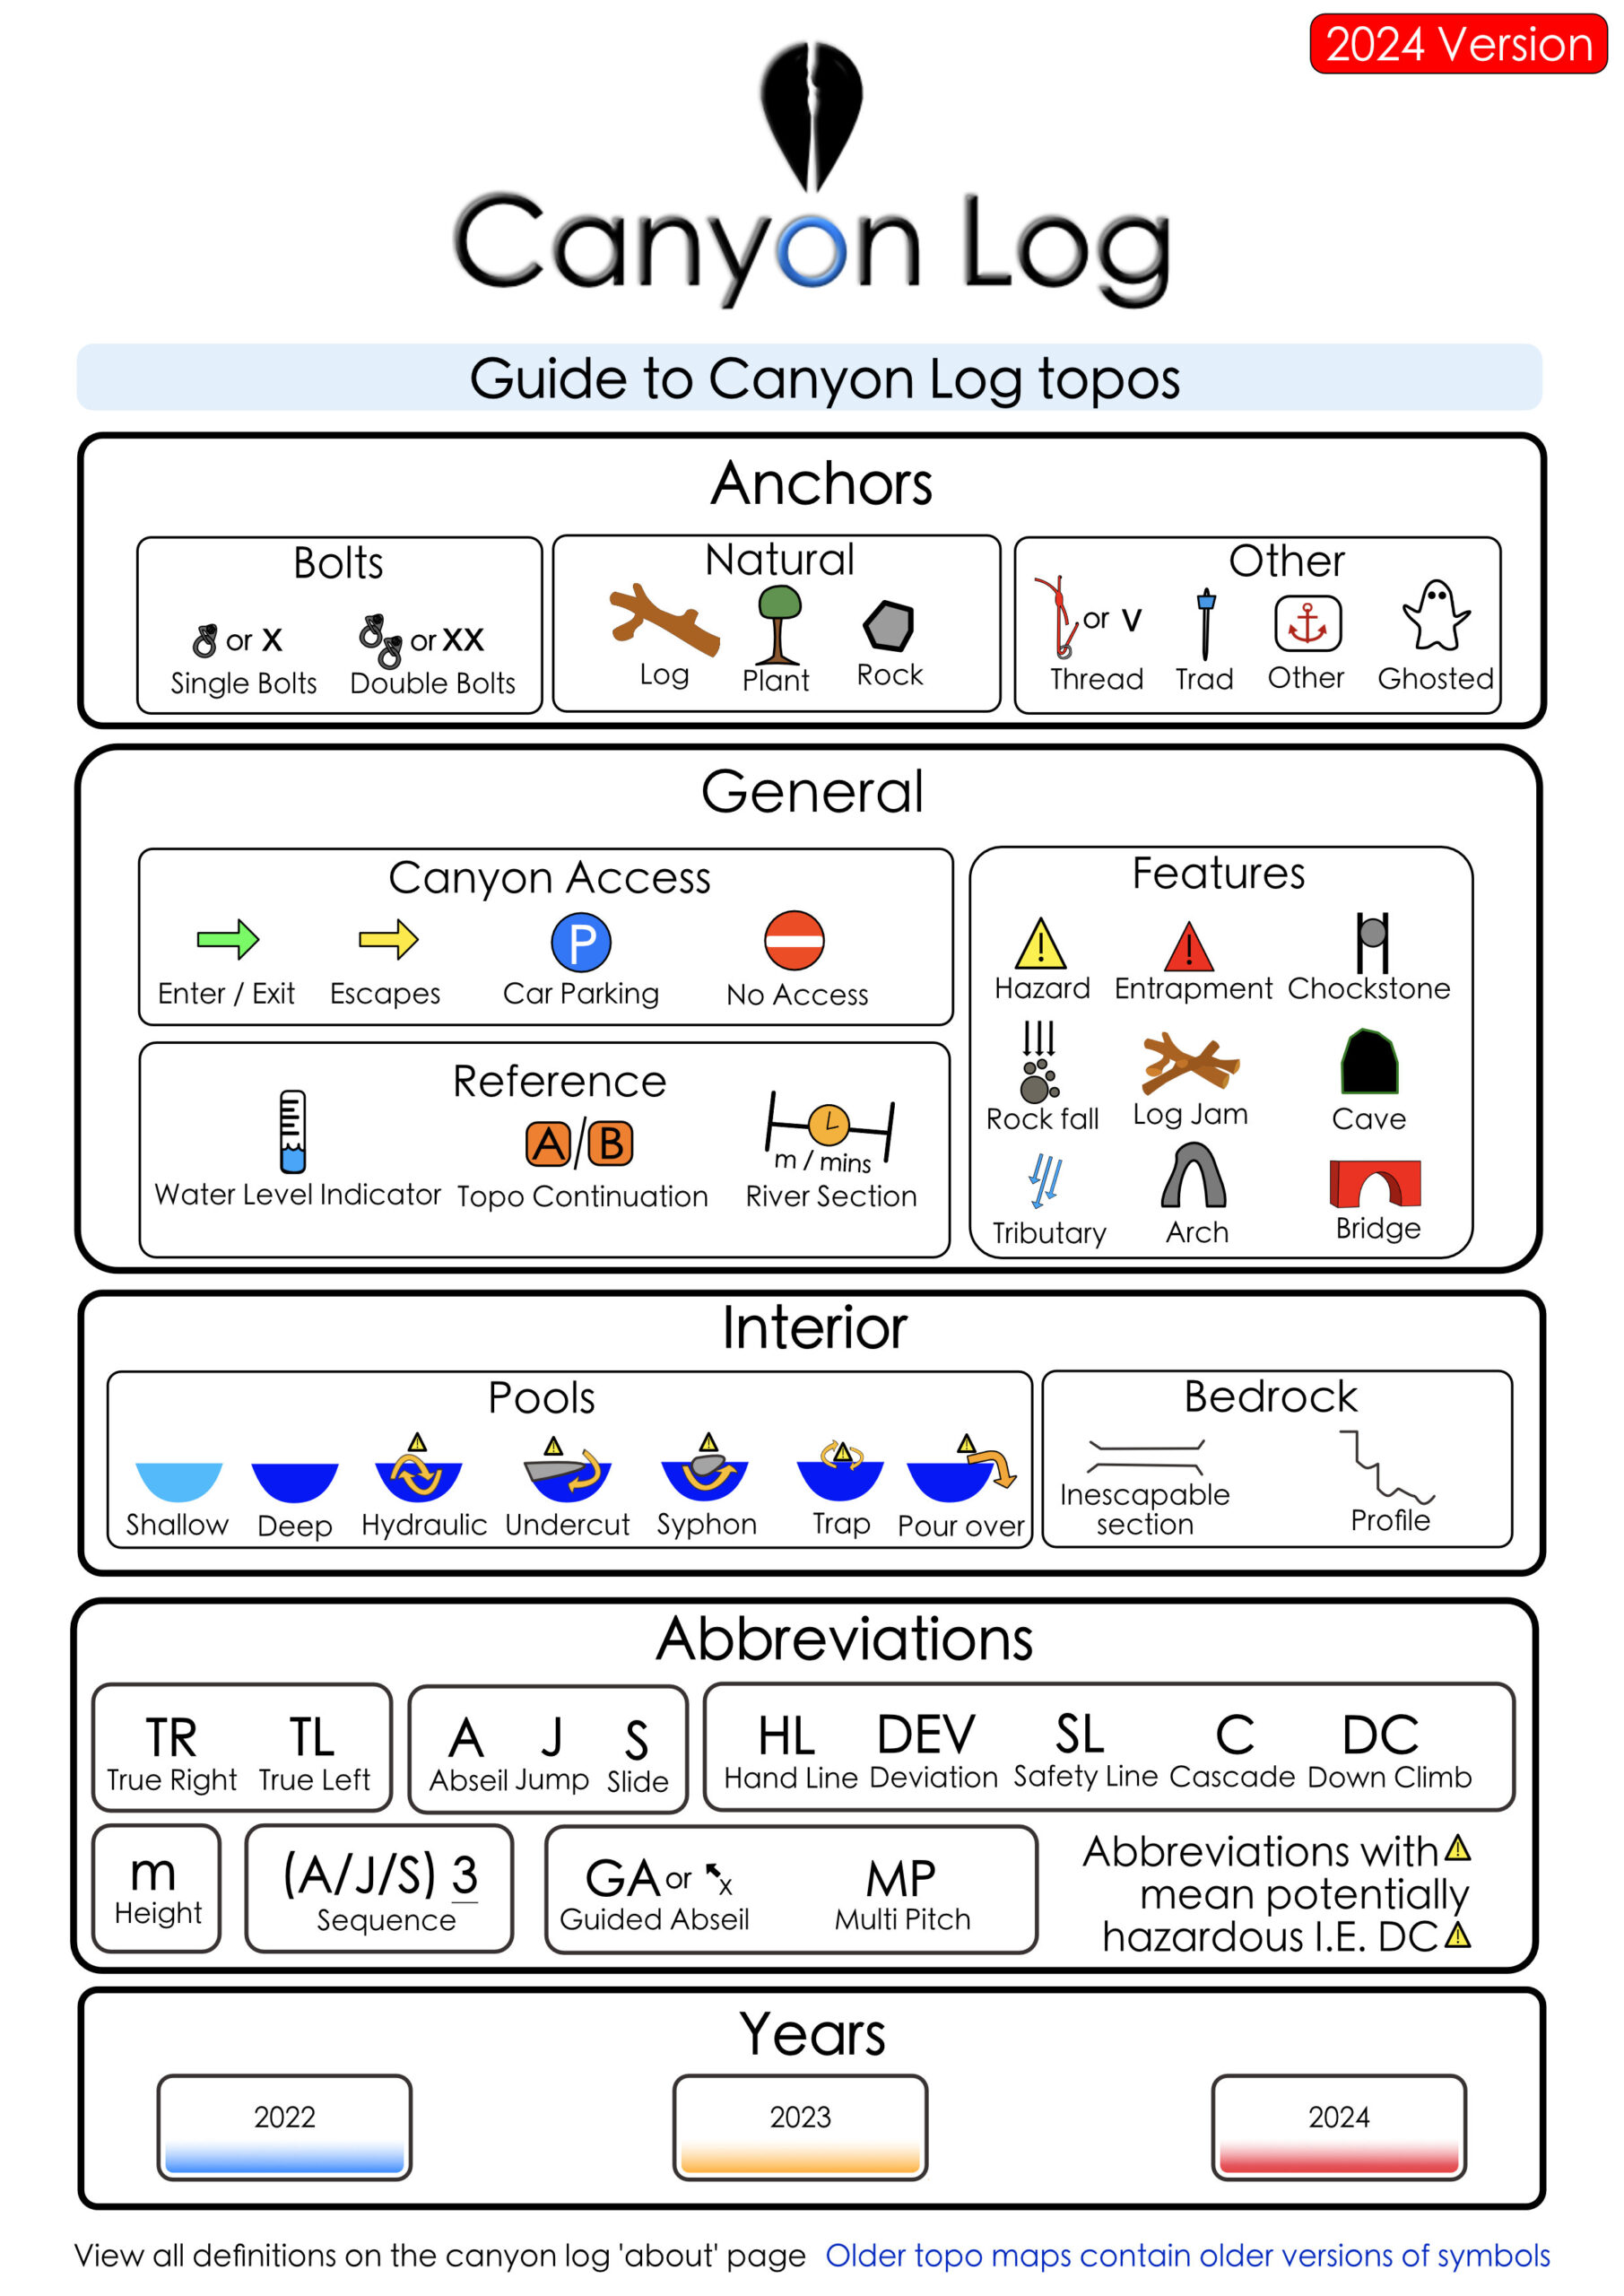
Topo Maps
A visual guide to the route inside a canyon.
Water Level Indicator
A photo of the river, used to predict the water level inside the canyon.
MANUALS
When writing the canyons summery you are aiming to describe the essence of the canyon with out too much detail. The following are examples of a good canyon summery:
Big, exposed waterfalls in the upper section, with a relentless narrow slot canyon below. Lots of delicate logjams!
Beautiful 4WD approach, a thick scrub bash approach and a great, consistent canyon. Lots of medium jumps and slide and good absiels.
Note how the summery can include information before/after the canyon.
Knowing the minimum number of ropes to descend a canyon is essential. When working this out you do not need to include a spare rope.
Remember the minimum number of ropes needed means 1x 60m is less than 2x 30m. The reason for including 2 shorter rope could be because of safety / hand lines leading to abseils.
Flood risk is based on a number of factors such as; Catchment area, Terrain, how difficult it is to escape the canyon and geographical location. If you are still unsure we recommend leaving this information blank.
Knowing these 3 factors will tell us lots about its steepness and difficulty.
How to work out the length:
- Step 1 – Launch google earth web app (click here)
- Step 2 – Find the start and end of the canyon on google earth.
- Step 3 – Click the measure distance button found on the left hand side of the screen.
- Step 4 – Click on the start of the canyon and draw the route following the river until you get to the end.
- Step 5 – Press enter and google earth will tell you the distance.
How to work out the descent.
To work out the Descent you will need a topo map of the canyon, click here to use one.
- Step 1 – Find the start of the canyon on the Topo.
- Step 2 – Count the number of contour lines from the start of the canyon to the end.
- Step 3 – Add together and times by the distance apart each contour line is from each other. (The map in the link has contour lines every 10m) for example 20 lines from start to finish X by 10m = 200m of descent.
How to work out the highest drop.
- Step 1 – Descend the canyon
- Step 2 – At the top of the highest drop lower your rope until it reaches the end.
- Step 3 – Where you are holding, attach a carabiner the rope with a clove hitch then pull the rope back to you.
- Step 4 – Measure the distance of rope from the end to the carabiner and this will tell you the highest drop.
Always round up, never down!
When we descend a canyon we need anchors,
If the canyon is fully bolted then select bolted. If it has both bolts and natural anchors as the only option then select mixed If it has just natural anchors then select natural. If the canyon is missing an anchor then enter this in the notes section. If the canyon has no anchors then select none.
Knowing the access to a canyon is key before stepping out of the car.
If the road, path to the canyon, canyon itself and path back to the car stays on public land the this canyon is public.
If at any point you cross private land then the canyon is classed as private.
Attaching photos of the canyon plus the walk in and out give us all a great idea about what we are heading in to. Remember these photos are public so make sure you have consent of anyone in it before posting.
NOTE: We do not publish photos of bolting so please do not send them.
If you are unsure about the type of bedrock found in the canyon, use this map to find out: VIEW MAP
If you’re unsure what classification the canyon is under, check out the definition of each found on;
About – General
To find the exact location of a canyon we use the latitude and longitude, this information is easy to find on google maps,
Step 1 – open google maps and find the canyon.
Step 2 – Right click on the exact location on the canyon.
Step 3 – A small grey pin will appear where you have clicked and the latitude and longitude will be displayed at the bottom of the screen. Copy the long number and paste into the form.
- Entry TL
- walk 100m
- A1 10m TR double bolt
- Shallow pool
- DC 3m
- A2 15m TL single bolt
- Deep pool
- escape TR
- A3 35m TL Natural anchor (sharp edges)
- deep pool
- (or 15m abseil then slide TR into A3 pool)
- down climb or jump 5m TR
- Exit at footbridge TL
To create your own Topo you will need a design program that can read vectors. Professional programs such as adobe illustrator and affinity designer are perfect for the job however you can make do with free software like Inkscape.
MAP
GRADES
TOPO RESOURCES
The two best ways of making notes during a descent are; Writing in a waterproof note pad and Filming whilst talking to the camera.
Writing notes may be worthwhile on a long descent where camera batteries will not last, filming however, is more reliable, efficient and produces more accurate topos. This is because you can watch the footage repeatedly to make amendments. and work see features you may have missed if writing.
The easiest way to measure drops accurately is;
Before your descent,
- Starting at either end, measure 1 meter of your canyoning rope.
- Pick up the rope so you have the meter length between your hands.
- Hold one end of the 1 meter length of rope with your arm out stretched to the side.
- Whilst keeping the rope taught, measure the other end of the 1 meter length against your shoulder line (Usually around your opposite shoulder bone.)
- remember the location where the 1 meter length reached to on your arm.
- At the top of the drop, through enough rope down until it touches the bottom.
- Measure the rope by pulling up 1 meter lengths and keeping count as you go.